by Brett Terpstra
marked -- the app
this is a reworked version of brett's documentation,
for this demo only; for the real thing, please visit:
http://markedapp.com/help
***
this is the version saved locally, as #3...
don't blame brett for this!
Marked Documentation
table of contents
Marked Help
Getting Started
Marked Basics
Especially For Writers
Advanced Features
Troubleshooting
About Markdown
Index
*********
Marked Documentation
table of contents
Marked Help
Getting Started
.....Overview
.....This is what Markdown is
.....This is what Marked is
.....Example Uses
.....This is what's new in this version
Marked Basics
.....Opening Files
..........Drag to Dock Icon
..........Using the Menu
..........Open Recent
..........On the Command Line
.....Previewing
..........Choosing a style
..........Text Zoom
..........High Contrast
.....Interface Features
..........Gear Menu
..........Keep on Top
..........View Source
..........Search
..........Showing Your Contents
..........Keyboard Navigation
..........Full-Screen
..........Clicking external links
..........Reference for Markdown
.....Exporting
..........Copy HTML
..........Save HTML
..........Print a PDF
..........Save PDF
..........Copy Rich Text
..........Save RTF
Especially For Writers
.....Document Statistics
..........Document Word Count and Statistics
..........Word Count for Selection
..........Readability Statistics
..........Visualize Word Repetition
.....Scrivener 2.0 Support
..........Scrivener 2.0 Basics
..........Headers in Markdown
..........Additional features
..........Security Note
.....Multi-file Documents
..........Book Formats
.....Fountain for Screenwriters
..........Install Fountain
..........Set Up A Custom Processor
..........Add Fountain's custom style
Advanced Features
.....Keyboard Shortcuts
.....Scroll to Edit Feature
..........Notes on Scroll-to-Edit
.....Toggle Header IDs
.....Using A Custom Processor
.....How to use a custom processor
.....Environment variables
.....Using Textile as your markup language
.....Using Custom Styles
..........How to set up a custom style
..........Watching CSS changes
..........Writing custom CSS
.....Workflow Integration
..........AppleScript
..........Marked Bonus Pack
.....Marked Special Syntax
..........Page breaks
..........File includes
..........Including code
..........Including unprocessed text or html
.....Per-Document Settings
..........Metadata format
..........Marked metadata keys
..........Per-document styles
..........Quotes language
..........Base header level
..........Inserting JavaScript
.....Using MathJax
..........Preview formulas with MathJax
.....For Programmers
..........Syntax Highlighting
..........Github-style line breaks
..........Fenced code blocks
Troubleshooting
.....Preview Not Updating
..........Time Machine
.....Overall Performance
.....Additional Help
About Markdown
.....About MultiMarkdown
..........MultiMarkdown vs. Markdown
..........Syntax Guides
..........MultiMarkdown License
Index
Getting Started
Marked Basics
Especially For Writers
Advanced Features
Troubleshooting
About Markdown
Index
Overview
This is what Markdown is
This is what Marked is
Example Uses
This is what's new in this version
The who, what, when, where and why.
Marked works with Markdown and MultiMarkdown, and can convert syntax from several variants for preview (it can also be extended to work with just about any processor you need, including Textile, reStructuredText, Wikitext and more). I assume that -- since you're here -- you at least know what these markup languages are. If not, you should start at John Gruber's Markdown Basics:
You might check out the TUAW Markdown Primer as well:
And you can also brush up on extended syntax with the MultiMarkdown User's Guide:
Finally, Marked includes a full Markdown syntax guide under the help menu, so you can check that out as you work.
Marked is an editor-agnostic MultiMarkdown Preview application which watches a file for changes, updating the preview every time you save. It's not an "instant" preview, but I've found it more efficient as it allows me to concentrate more on writing and less on how my Markdown is rendering. Any time I want to see the results, I just press Command-S and my preview is updated.
Marked works with any file on your local drive, including iCloud documents. Just drag the document from any text editor's toolbar to Marked and it will render it as an HTML preview and start tracking changes, updating the preview as you write. It can even compile multi-file documents using a basic "include" syntax, or from Scrivener, Leanpub.com and mmd_merge index formats.
Marked has additional features, including word count and other document statistics, the ability to float above other applications or dim in the background, and it can display your work in a variety of well-crafted styles. It can output to print or PDF, save complete HTML documents and copy HTML source to your clipboard with a keystroke. Marked also has a basic AppleScript dictionary and a command line tool that make it easy to integrate into your workflow.
Marked turns any text editor into a Markdown-enabled editor. Your preview is always available and it updates as you work.
The latest stuff...
<!--BREAK-->)
.scriv) to Marked and it will be compiled and previewed
mark, installation instructions under "Help")
Marked gives you options.
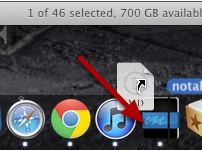
The easiest way to use Marked on a file you're already editing is to drag the document icon from the toolbar of your editor or from Finder to the Marked icon in your Dock. Marked will immediately start tracking any Markdown file (or text file) dropped on it. You can also drag files directly from the Finder.
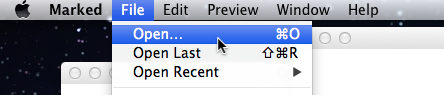
You can, of course, open Markdown files directly using the File->Open... menu option. Marked works fine without a text editor, too. You can preview and convert your Markdown with just a click.
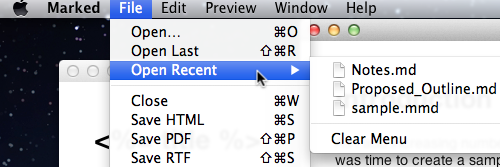
Marked keeps track of recent documents, too. The File->Open Recent menu option will show you the files you've had open and let you jump back to them. You can quickly re-open the last file you were viewing with Command-Shift-R. There are a lot of other keyboard shortcuts, too. If you care to learn them, you can find a chart by clicking the Special Features link in the sidebar.
You can install the Marked command line utility from the Marked menu. Once you've done that, you'll be able to open your files in Marked using mark filename.md. Future versions of Marked will have additional command line features.
Changing the way you see things.
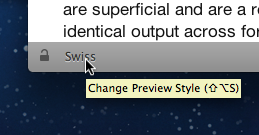
You can set a default style for new documents in the Window Preferences. If you have the style menu in the toolbar enabled (Window Preferences), you can adjust the style on a per-document basis right from the Preview window. Your style selection will be remembered and will be the first choice for export and print options.
Custom styles added in the Style preferences will be available in both menus.
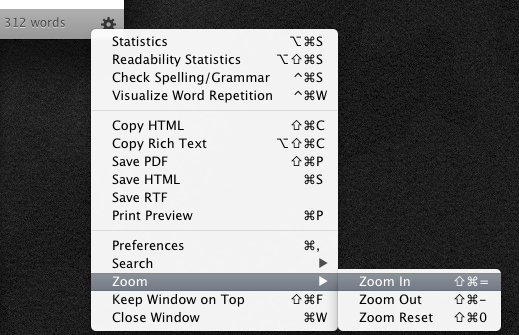
You can change the text size using the Zoom menu under Preview in the menubar or in the gear menu on the document window. Marked will remember any changes you make for next time (and every time).
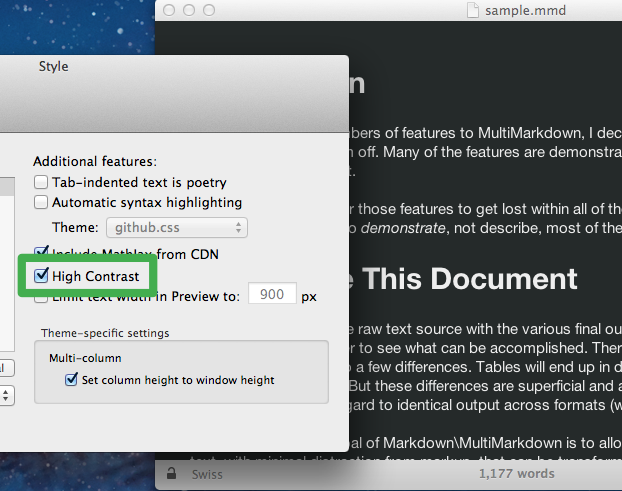
If you prefer light text on a dark background, Marked has you covered. In the Style preference panel, you can invert any of the existing schemes.
Flexibility is key.
The Gear menu provides most of the features found in the menubar, plus some preview-specific functions. Just click the gear in the lower right of the window to access these functions.
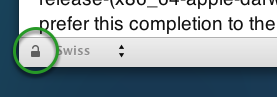
The lock icon in the lower left will bring the Preview window to the front and keep it there (float it) when switching to other applications. You can set a transparency on the window in Preferences which will allow the window to fade when using other applications.
This feature can also be toggled with Command-Shift-F.
You can switch between preview and source code views with the button in the upper right corner. This view can also be toggled with Command-U.
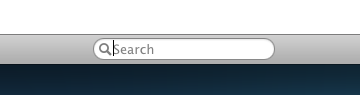
The find bar can be accessed with Command-F and allows you to search through the preview for a word or phrase. Once you search, you can use Command-G and Shift-Command-G to navigate forward and backward through additional results.
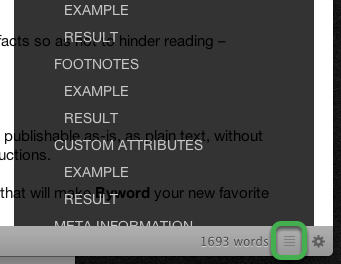
If your document has headers in it, a list button will appear in the toolbar. Clicking this button will expand the Table of Contents, and clicking the title of a header will navigate to that section of the preview.
The preview window can be navigated quickly using keyboard shortcuts. Set bookmarks on scroll position using Shift-(1-9), and jump back to them using just the number of the bookmark (1-9). Changing the current Style or adjusting the page size will affect the bookmark location. These are meant to be temporary markers when reviewing a document and do not persist between document sessions. They will persist through refreshes and document changes, though.
There are additional shortcuts available. Press the "h" key at any time and a list of shortcuts will be shown.
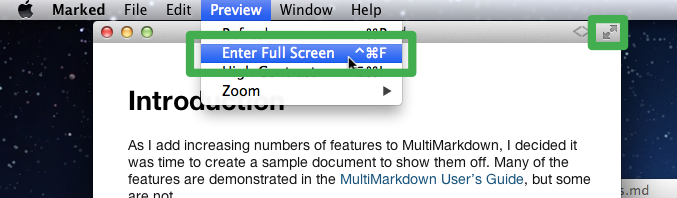
Full-screen mode can be toggled from the Preview menu, by clicking the double arrow symbol in the upper right corner of the window or by typing Command-Control-F.
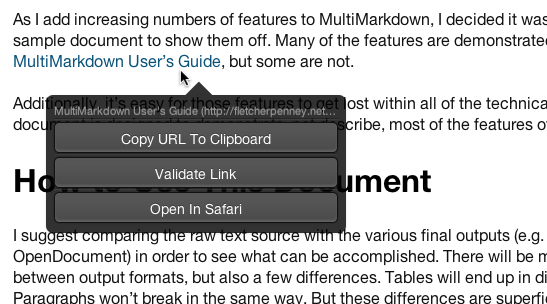
Clicking an external link in your document's preview will open it in your default browser. If you click and hold, when you release Marked will give you three options: you can copy the link's URL to your clipboard, validate the link, or open the link in your default browser. Just click anywhere in your preview to dismiss the window. This feature can be disabled in the Behavior preference pane.
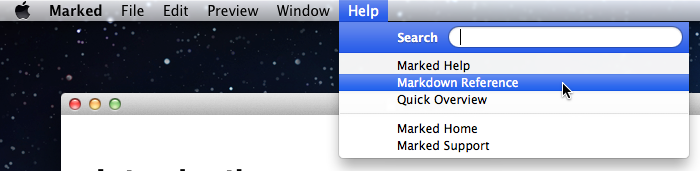
Select Markdown Reference from the Help menu to display a guide that floats over your other windows. This is handy for those who are still learning Markdown's syntax. You can open this panel via the keyboard using #¡!M.
Turning your Markdown into a finished document.
Use the Copy HTML feature to put the HTML source code for your preview into your clipboard without any hassle. You can select it from the gear menu, or just hit Command-Shift-C. The copied HTML will be a snippet ready for insertion into a blog, forum or existing HTML document.
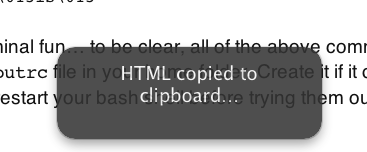
You don't need to be in the source view to copy. With the preview focused (click on it), just type Command-Shift-C and you'll see a popup message letting you know that the source is in your clipboard.
The Save HTML command-accessible from the gear menu or by simply typing Command-S-will allow you to save a full document ready for sharing or publishing.
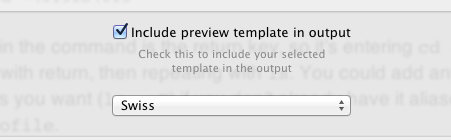
You can optionally include any of Marked's styles -- or one of your Custom Styles -- in your export, giving you a ready-to-go document with necessary formatting already embedded.
Embedding styles with MultiMarkdown comes with a small caveat: if you have any metadata in the top of your document, MultiMarkdown 3 will render a complete document on its own and embedding styles will not be an option. You can, however, use the HTML Header metadata to include your own stylesheet. Checking Strip MMD3 Metadata in Behavior preferences will circumvent this issue, but your metadata will not be included in the final output.
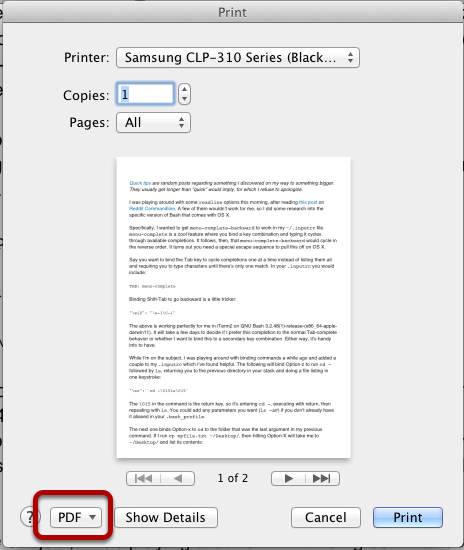
Print a PDF Preview (Command-P) will bring up a standard print dialog. Each preview style in Marked has its own accompanying print styles which remove backgrounds, modify type sizes and provide borders. The preview will print based on the currently-selected style.
Prominent on the print dialog box are the PDF and Preview buttons. PDF will give you a variety of options for exporting to PDF (based on your available applications) and Preview will export a PDF version directly to Preview.app where you can save or email it.
*********Printing to PDF using this method will include pagination. When printing to paper or PDF, pagebreaks may be inserted manually by using the <!--BREAK--> syntax, or by setting preferences under Printing to use level one and/or level two headers as section dividers.
There is also a preference for turning horizontal rules (<hr>) into page breaks when printing. Doing so will replace the line created by the tag with a page break, removing it from the final output. The preview is unaffected by this setting.
This option saves your Preview directly to a PDF file on your drive. Your document will be rendered in its entirety, without page breaks. To include pagination in your output, use the Print a PDF option.
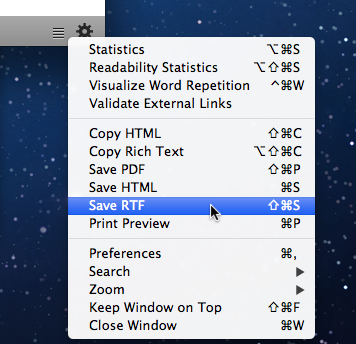
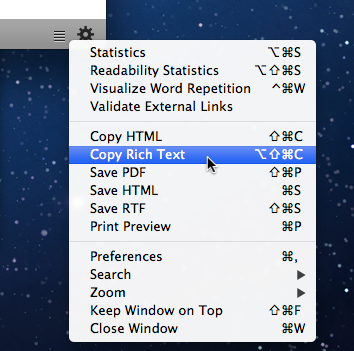
Marked can export RTF (Rich Text Format) data directly to your clipboard. Just choose the Copy Rich Text command from the gear menu.
Marked can also save your file as an RTF (Rich Text Format) file with the Save RTF command.
Keep track as you write.
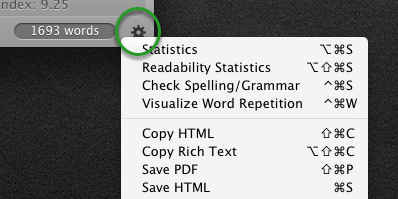
Word count is located in the bottom status bar and can be enabled and disabled from Preferences. You can view further statistics in the preview or source window from the gear menu, clicking the word count or by typing Command-Option-S.
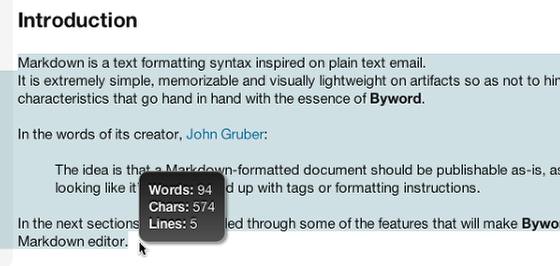
When you select text in the preview, a small box will pop up by the mouse to show the word/line/character count for just the selected text. This is dismissed simply by moving the mouse away from the popup.
Additional statistics from Flesch/Kincaid and the Fog Index are available with Command-Shift-Option-S. This feature is still experimental and the results are not guaranteed to be 100% accurate.
Selecting Visualize Word Repetition from the gear menu -- or pressing Command-Control-W -- will open up a special overlay for displaying words that are repeated in your document. Repeated words are displayed in bold, and hovering over a bolded word will highlight the matching words throughout the document. Clicking a bolded word will darken the background and "stick" the highlighting for further review.
Scope
The scope of the repetition check can be changed at the top of the preview and set to Document or Paragraph. Document mode is default; selecting Paragraph only counts repetition within each block of text. Repeats will still be highlighted through the entire document, but only counted if a word appears more than once within a paragraph.
Exiting Word Repetition mode
You can close the word repetition view using the Close button at the top or by clicking in the gutter to either side of the view.
Use your two favorite writing tools together.
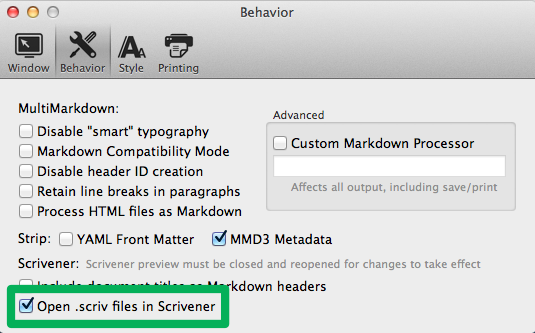
Drag a Scrivener project (.scriv) to Marked and it will be compiled and previewed. If you choose the option to open .scriv files in Scrivener (above), Marked will also launch Scrivener when you drag the file to Marked.
As with other documents, changes to Scrivener files are updated live on save. Also, when a Scrivener document is in the foreground in Marked, Command-E will open it in Scrivener for you.
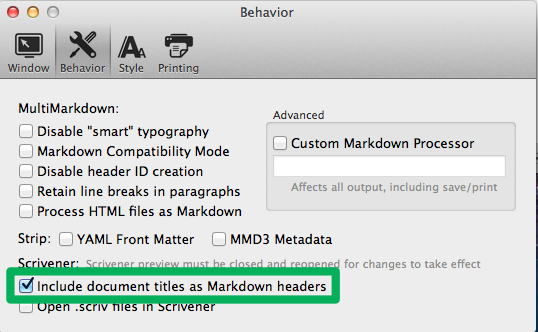
Marked can also create hierarchical Markdown headers for you based on your Scrivener file's pages. To enable this, just check the option shown above.
In addition to the basic compiling and preview features, Marked also supports some Scrivener-specific conventions. First, in your Scrivener document, you can use "Preserve Formatting" inline or on a block of standalone text and it will be converted to code blocks in the preview.
Marked also reads inline footnotes from Scrivener. If you enter a footnote within or at the end of a paragraph, it will be converted to a MultiMarkdown footnote in the preview.
A cache folder will be created in ~/Library/Application Support/Marked when you open your .scriv file in Marked. This is not a protected folder, so if your original document is on an encrypted disk or otherwise protected, note that its contents will be unencrypted in the cache.
For limited protection, you can ensure this cache doesn t show up in Spotlight by adding ~/Library/Application Support/Marked to your privacy settings in Spotlight.
You can include external files in a single preview document by using the syntax <<[path/file] at the beginning of a line. The line should have blank lines above and below it, and the path is assumed to be relative to the main document unless it begins with a slash (/) or a tilde (~). Slash (root directory) and tilde (home directory) may be used to define absolute paths to files. No path is needed if the external files are in the same folder as the main document, just put the filename (case sensitive and including extension) in the square brackets.
Using this feature you can build large documents/books using multiple files (e.g. a file for each chapter) and then specify the document order in a single index file. It doesn't matter how any of the files are named or how the folders are organized; the file you open in Marked will be considered the index and the files listed inside it will be included.
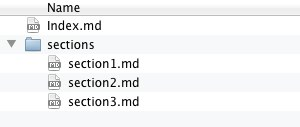
An example of an index file for a three-part document:
Folder structure:
http://zenmagiclove.com/zml/markd/multifiledocumentstructure.png
Index.md:

 # Document title

 # Section 1

 <<[sections/section1.md]

 # Section 2

 <<[sections/section2.md]

 # Section 3

 <<[sections/section3.md]
Opening Index.md in Marked will display its contents with all three included files expanded inside. All included files will be watched for changes. Unlike the open document in Marked, included file tracking depends on Spotlight to obtain updates and must exist in a Spotlight-indexed folder on your disk.
You can also include code snippets and raw html or text using variations of this Special Syntax.
Note: the more files included in a document, the slower the overall compile time of the preview will be. Marked tries to optimize and cache the process, but expect some rendering delays as your document size increases.
Marked also supports index files in formats like Leanpub.com and mmd_merge in MultiMarkdown.
These require that the first line be "frontmatter:" (Leanpub.com format) or "#merge" (special Marked trigger for mmd_merge, treated as a comment and ignored by other processors). Included files will be watched for changes and the result is a complete preview of your compiled document, just like the "Index.md" example above.
Fountain is a specialized text markup language that is designed for writing screenplays. Screenwriters who write using Fountain's syntax can use Marked to preview their work:
To use Marked with Fountain, you'll need to first download and install Fountain's files. You can find complete instructions on the candler blog:
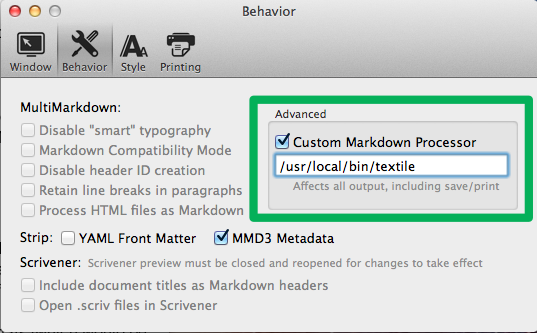
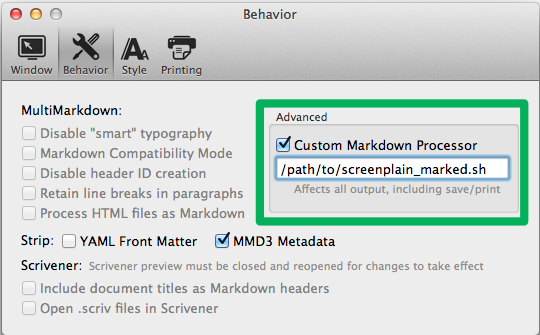
After you've installed Fountain, select Behavior in Marked's Preferences, check the box to use a Custom Markdown Processor, and add the path to your screenplain_marked.sh file.
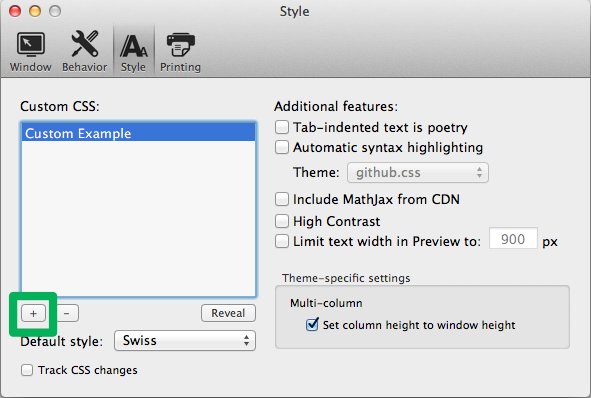
To correctly preview your screenplays, select Style in Marked's Preferences, click the + sign beneath the Custom CSS box, and find your copy of Fountain.css.
Keyboard Shortcuts
Scroll to Edit
Toggle Header IDs
Using A Custom Processor
How to use a custom processor
Workflow Integration
Marked Special Syntax
Per-Document Settings
Using Mathjax
For Programmers
A floating panel with a shortcut cheat sheet is available from the Help menu, or by pressing cmd-K.
| Function | Shortcut |
| Preferences | #, |
| Open | #O |
| Re-open Last | cmd-R |
| Close | #W |
| Print Preview Window | #P |
| Save HTML | #S |
| Save PDF | cmd-P |
| Save RTF | cmd-S |
| Copy | #C |
| Copy HTML Source to clipboard | cmd-C |
| Toggle Source View | #U |
| Toggle Table of Contents | #T |
...table continues on next page...
*********
...keyboard shortcuts, continued...
| Reload Preview | #R |
| Select Style | #(1-9) |
| Gear Menu | #/ |
| Zoom In | cmd-= |
| Zoom Out | cmd-- |
| Reset Zoom | cmd-0 |
| Minimize | #M |
| Keep on Top | cmd-F |
| Visualize Word Repetition | ^#W |
| Document Statistics | #%#S |
| Readability Statistics | cmd-%#S |
| Toggle Custom Processor | #%#C |
| Search | #F |
| Highlight next match | #G |
| Highlight previous match | cmd-G |
Press "?" at any time to view the following shortcuts in the Preview window.
Preview Navigation Shortcuts
| Function | Shortcut |
| Jump to Top | t or gg |
| Jump to Bottom | b or G |
| Set a Bookmark | cmd-(1-9) |
| Scroll to Bookmark | |(1-9) |
| Next/Prev Bookmark Numerically | N/P |
| Next/Prev Bookmark in Page Order | n/p |
| Scroll Down/Up | j/k |
| Scroll Up/Down Faster | J/K |
| Navigate All Headers | ,/. |
| Navigate H1/h3 Headers | </> |
| Jump to Most Recent Edit Point | e |
| Close an Open Overlay | esc |
| Show/Hide Help Hud | h |
When the Table of Contents is open, you can navigate via keyboard.
Table of Contents Navigation
| Function | Shortcut |
| Open TOC | #T |
| Select first/next header | j/Up Arrow |
| Select previous header | k/Down Arrow |
| Scroll to selection | o |
| Open TOC quick-search | Space |
| Select first search result | Down Arrow/Tab |
| Clear search/Dismiss TOC | Esc |
The "scroll to edit" feature in Marked keeps track of differences between the latest update and the last, trying to find the point where you made your most recent changes. Marked always tracks this, and a small red line appears in the preview to show you the location of the first change detected. In the Behavior preference panel, you can turn on "Scroll to first edit" and when a preview updates it will gently scroll the view to that location.
With "Scroll to first edit" turned off, you can still press the "e" key at any time in the preview to go to the last stored edit point.
This is a feature that is great when it works, but there are a lot of complications. Especially the first few times the document updates, there may be some jerkiness in the scroll. If your changes are all inside of one very large element (an excessively long paragraph, for example), it will only be able to get close with the marker. Similarly, if you add one or two words to the end of the document, the change marker will be positioned in the element above until there is enough content to anchor in the new element.
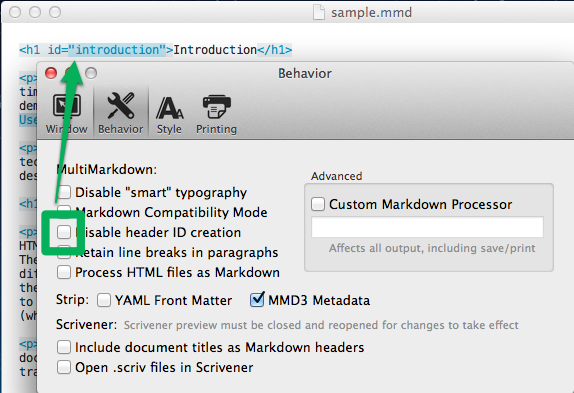
Marked can generate header IDs automatically.
You can find an option on the Behavior pane in Preferences to disable this.
Marked gives you full control.
You can specify a custom Markdown processor in the Behavior section of the Preferences. Enter a UNIX path to an executable or script which can take input on STDIN and return output on STDOUT and it will be used for Preview, Source, Print and Save operations. This can, for example, allow Maruku or Kramdown to be used instead of MultiMarkdown, or even incorporate Textile and other markup languages into Marked.
Marked sets an environment variable for the current working directory (PWD) to the location of the file currently being previewed. You can use this to change the working directory of a script and include files with relative paths to the current document. As an example, in Ruby you can use:
Dir.chdir(ENV['PWD'])
When enabled, the custom processor can be turned on and off for individual documents using Command-Option-C.
Marked runs the custom processor in its own shell, meaning standard environment variables are not automatically passed. You can use Marked's environment variables to augment your own in your scripts. Marked makes the following variables available for use in your shell scripts:
/Developer/usr/bin:/usr/bin:/bin:
/usr/sbin:/sbin:/usr/local/bin.A few people have asked how to get Textile working in Marked. You need to have a Textile converter available from the command line. There are a few options, including Pandoc, but the two easiest I've found are RedCloth for Ruby and Textile for Perl (requires that the Developer Tools be installed).
*********
sudo gem install RedCloth in Terminal./usr/bin/redcloth for RedCloth.
Note: your install paths may differ. You can determine the correct path using which textile or which redcloth in the Terminal.
Now Marked is a Textile previewer for you!
View your documents your way.
Add custom stylesheets to Marked using the Styles pane in Marked Preferences. Styles will be named based on the base filename of the CSS file added. New styles will be added to the dropdown menus in Window preferences and on each window. Store your custom CSS files in a safe place on your drive. "Bad Things" may happen if you remove or rename a CSS file while it's active in Marked. Close windows and remove the style from Preferences when deleting or renaming a CSS file used by Marked.
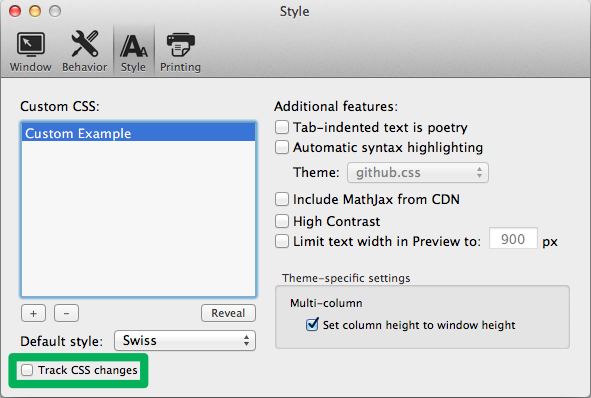
You can check a box below the Custom Styles table to have Marked watch the active CSS file in addition to the Markdown file you're editing. When changes are detected on either file, the preview will update. This is useful for editing custom styles without constantly refreshing and can also be used for simple web development tasks. You can open straight HTML documents and assign a custom stylesheet, and if you set your custom processor to /usr/bin/php, you can also have PHP files rendered in the preview.
If you're familiar with CSS, you can create your own style sheets for use in Marked. This knowledge base article has detailed instructions for writing and sharing your creations:
Marked has a basic AppleScript dictionary, and allows you to get the currently open file from multiple windows, as well as open files from scripts. This allows some workflow integration if you know a little bit of AppleScript. You can have any application which can trigger an AppleScript open a document in Marked, or have it pull the currently-previewed document in Marked in for editing.
The AppleScript integration also allows applications such as Tags.app to function directly within Marked.
The Marked Bonus Pack is a collection of scripts, commands and services. Some work with multiple editors, some are specific to certain editors. The Services will generally work with any editor that has the necessary capabilities. The rest are organized in folders based on the application they work with.
You can download the Bonus Pack and find instructions for installing and using it in this knowledge base article:
You can force page breaks in a document printed from the preview by inserting an HTML-style comment in your document:
<troubletrouble??>
Place that tag at the beginning of a line at any point in your document where you'd like to force the page to end and begin printing on the next page. These comments won't show up in exported HTML, and won't affect your preview or document statistics. Marked also recognizes Leanpub.com pagebreak format, so current documents are already compatible.
Note that in the Printing section of Preferences you can also tell Marked to automatically substitute page breaks for horizontal rules (---) or use level 1 and/or 2 headers as section dividers.
The contents of additional files can be inserted by using the syntax:
<<[folder/filename]
The path to the file can be relative to the index file or absolute. Includes can be nested; you can use this same syntax inside of an included file. If you're using relative paths, includes in nested files should be relative to that file. However, MultiMarkdown will process everything based on the location of the first file opened, so all image paths or other embeds should be relative to the first parent file, even when they exist in child documents.
See Multi-File Documents for more information.
Marked can include external files as code using a syntax similar to file includes above:
<<(folder/filename)
Note the parenthesis instead of square brackets. For compatibility with Leanpub.com syntax, Marked will also recognize a preceding set of square brackets containing a title, but at the current time nothing is done with it in Marked:
<<[Code title](folder/filename)
The contents of the specified file will be inserted within a pre>code block in your document and will be available for automatic syntax highlighting if it's enabled. Code blocks can not be nested and will not be processed with MultiMarkdown. Custom processors will still be run over the pre>code block created.
Note: This feature is for advanced users.
If you want to include raw HTML or other text that should not be processed by MultiMarkdown (or your custom processor), you can use curly brackets ({}) to include a file after processing the rest of the document:
<<{folder/raw_file.html}
No include syntax will be recognized within these files (no nesting) and the raw contents of the file will be inserted in the final HTML output. This is great for inserting HTML without bogging down the text processor or having things converted/escaped when you don't want them to be, but be careful as there are few safeguards to ensure formatting of the document is preserved around what you insert.
Marked will allow certain parameters from a document to be set in MultiMarkdown metadata format (detailed below). You can use these to define characteristics and styles that only affect the current document.
Most MultiMarkdown headers are ignored by the preview, but the following are allowed and affect rendering. You can include other metadata to be rendered in the final output, Marked will just ignore keys not listed below. If you save as HTML and do not include a template, Marked will render all metadata keys as expected.
Metadata is entered at the very top of the Markdown file or immediately following any Yaml headers. They consist of a key, followed by a colon, optional spaces or tabs and the value:
Example metadata: example key
Multiple metadata entries should be on their own lines, but without any line breaks between them. The last metadata entry needs to be followed by a blank line before the start of the document text.
First: the first metadata entry
Second: this is the second entry
Third: the last metadata entry
# The beginning of the document text
this is a heading without a cause.
The "Marked Style:" key will set a preview style for the document. The value can be the name of a default style or a name or path for any Custom Styles you have defined in the preferences. If this key is found and matches a style that Marked knows about, that style will be used for the preview every time the document containing it is loaded.
Example
Marked Style: Upstanding Citizen
By default, Marked uses English-style quotation marks. You can modify this on a per-document basis with the "Quotes Language:" key. Available languages are:
Example
Quotes Language: french
Creates French-language ¥quotation marks.™
You can set the header level that Marked starts counting from with the "Base Header Level:" key. This should be a number 1-6, and will modify the way that "#" headers are rendered. If you set the header level to 3, then what would normally be a first-level header (h1) is rendered as a third-level header (h3), and subsequent headers in the hierarchy are shifted up by 2.
Example
Base Header Level: 3
# This headline will render as an h3
# This headline will be an h4
Renders as:
<h3>This headline will render as an h3</h3>
<h4>This headline will be an h4</h4>
This specifies data that is included in the <head> tag of the document. Marked ignores most values for this key, except in full-document output, but will respect scripts included in this manner. Script tags defined here will not be in the header, however, they'll be appended before the closing </body> tag. jQuery is already loaded, and you can take advantage of that in any scripts you inject.
Example
XHTML Header: <script>(function($){$('#wrapper').fadeOut();})(jQuery);</script>
-or-
XHTML Header: <script src="myfancyscript.js"></script>
Numbers matter just as much as words.
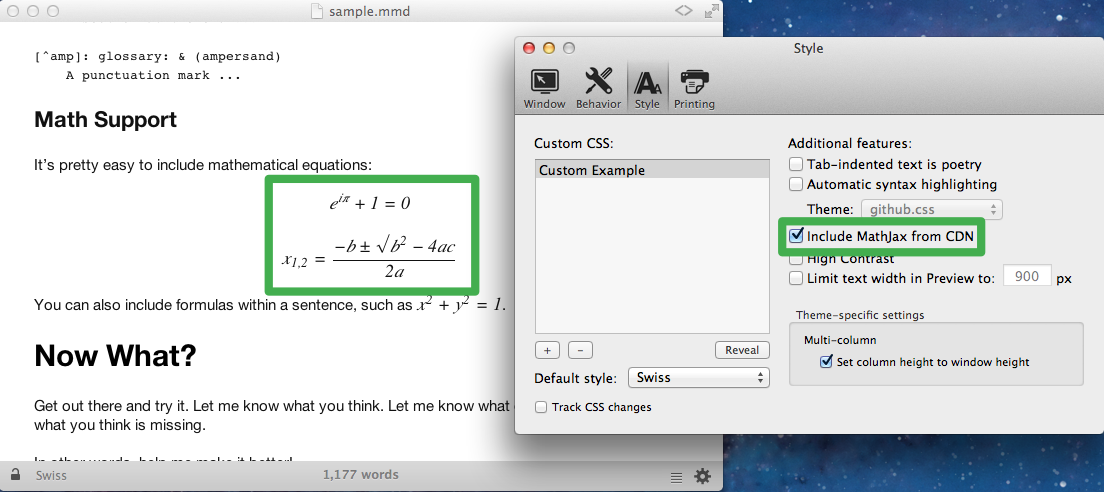
By turning on MathJax in the Behavior preferences, when you have a network connection to the Internet, the necessary scripts will be included in the preview. Then MultiMarkdown math syntax can be used in your Markdown document and the results will be displayed.
Syntax highlighting can be enabled in the Style preferences. It will recognize code blocks, detect the language and render color-coded output in the preview. There are multiple themes available, selected by the dropdown below the option in preferences. The selected theme will apply to all documents.
Marked uses highlight.js -- from http://softwaremaniacs.org/soft/highlight/en -- to provide consistent color coding for all types of embedded code, including standard Markdown syntaxes that don't allow language to be specified. Highlight.js autodetects quite well. There are some minor rendering differences between it and colorizers such as Pygments (GitHub style), but the output is quite similar. Using the github.css theme on Ruby code, for example, renders almost the exact output you'd see on GitHub.
The GitHub stylesheet provides backup styles for blocks actually rendered with Pygments. If the <pre> tag is inside a div with the class "highlight", it will display using the standard GitHub styling, not Marked's. You can render the code externally and paste HTML, or use pygmentize to render it to html files and include them with the <<(source.html) Special Syntax.
Syntax highlighting will show up in the preview and in print and PDF export. If enabled in preferences and the theme is included when exporting HTML, the highlight.js library used by Marked will be embedded in the HTML output, allowing your exported HTML to appear as it does in Marked.
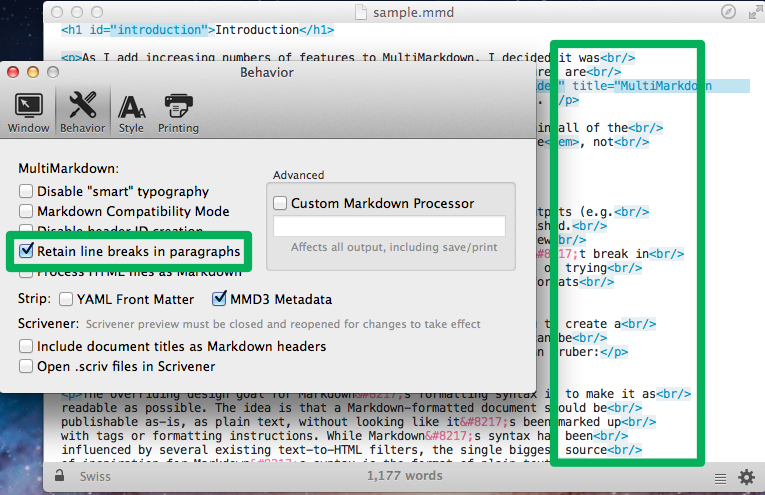
Marked can preserve line breaks in your paragraphs. Just select Behavior in Preferences and check the box to retain line breaks in paragraphs.
If enabled in the Behavior preferences, fenced code blocks in your document will be rendered. Fenced code blocks are delimited by three or more tildes -- "~" -- or backticks -- "`". You can use more than three, but the beginning and ending delimiters must have exactly the same number of characters.
~~~
Some code rendered as pre/code block
~~~
Languages may be specified using the language title (or short title) after the delimiter in the first line, or in curly brackets (with or without a leading period) after the last delimeter. For example:
~~~~~ruby
some ruby code
~~~~~
Or:
some Java code
 {.java}`
The built in syntax highlighting will recognize 41 different language specifiers. If there is no language specified, it will detect it automatically, so it's not required for the preview. The language string given will be output in the final html as a class on the "code" tag.
See the section on Marked Special Syntax to learn how to include external code files in your document.
Previews not updating as expected? It's probably because of Time Machine.
There have been some issues reported regarding slow (or non-existent) updates during a Time Machine run. The update capabilities of Marked may be impaired if Time Machine is using the portion of the drive where the file exists at the time. This will usually remedy itself when Time Machine finishes its run.
If you have trouble with Marked not responding to updates after Time Machine has completed its run, or at a time when Time Machine isn't running at all, please file a ticket on the Marked Support Site, and we'll troubleshoot this with you.
Marked's overall rendering speed and performance can vary greatly based on your settings in preferences and the type of content you have in your document. There are several factors that can lead to slow rendering or long delays:
If you have any other issues with Marked, you can search the Marked Knowledge Base for answers to your specific question:
If you're unable to find an answer, please feel free to file a ticket at the Marked Support Site and we'll help you just as soon as we're able.
Markdown originated from John Gruber.
MultiMarkdown, by Fletcher Penney is an extension of Markdown.
Markdown observes all standard Markdown formatting, plus provides additional syntaxes for elements such as tables and footnotes.
There's a Markdown Syntax guide under the help menu, or you can refer to John Gruber's original documentation:
MultiMarkdown extensions are documented by Fletcher Penney in this document:
AUTHOR
John Gruber at http://daringfireball.net
PHP port and other contributions by Michel Fortin at http://michelf.com
MultiMarkdown changes by Fletcher Penney at http://fletcherpenney.net
COPYRIGHT AND LICENSE
Original Markdown Code Copyright (c) 2003-2007 John Gruber at http://daringfireball.net All rights reserved.
MultiMarkdown changes Copyright (c) 2005-2009 Fletcher T. Penney at http://fletcherpenney.net All rights reserved.
Redistribution and use in source and binary forms, with or without modification, are permitted provided that the following conditions are met:
This software is provided by the copyright holders and contributors "as is" and any express or implied warranties, including, but not limited to, the implied warranties of merchantability and fitness for a particular purpose are disclaimed. In no event shall the copyright owner or contributors be liable for any direct, indirect, incidental, special, exemplary, or consequential damages (including, but not limited to, procurement of substitute goods or services; loss of use, data, or profits; or business interruption) however caused and on any theory of liability, whether in contract, strict liability, or tort (including negligence or otherwise) arising in any way out of the use of this software, even if advised of the possibility of such damage.
this is the end of the index.
Marked Documentation
........table of contents
........Marked Help
........Getting Started
................Overview
................This is what Markdown is
................This is what Marked is
................Example Uses
................This is what's new in this version —
........Marked Basics
................Opening Files
........................Drag to Dock Icon
........................Using the Menu
........................Open Recent
........................On the Command Line
................Previewing
........................Choosing a style
........................Text Zoom
........................High Contrast
................Interface Features
........................Gear Menu
........................Keep on Top
........................View Source
........................Search
........................Showing Your Contents
........................Keyboard Navigation
........................Full-Screen
........................Clicking external links
........................Reference for Markdown
................Exporting
........................Copy HTML
........................Save HTML
........................Print a PDF
........................Save PDF
........................Copy Rich Text
........................Save RTF —
........Especially For Writers
................Document Statistics
........................Document Word Count and Statistics
........................Word Count for Selection
........................Readability Statistics
........................Visualize Word Repetition
................Scrivener 2.0 Support
........................Scrivener 2.0 Basics
........................Headers in Markdown
........................Additional features
........................Security Note
................Multi-file Documents
........................Book Formats
................Fountain for Screenwriters
........................Install Fountain
........................Set Up A Custom Processor
........................Add Fountain's custom style —
........Advanced Features
................Keyboard Shortcuts
................Scroll to Edit Feature
........................Notes on Scroll-to-Edit
................Toggle Header IDs
................Using A Custom Processor
................How to use a custom processor
................Environment variables
................Using Textile as your markup language
................Using Custom Styles
........................How to set up a custom style
........................Watching CSS changes
........................Writing custom CSS
................Workflow Integration
........................AppleScript
........................Marked Bonus Pack
................Marked Special Syntax
........................Page breaks
........................File includes
........................Including code
........................Including unprocessed text or html —
........(continued) Advanced Features (continued)
................Per-Document Settings
........................Metadata format
........................Marked metadata keys
........................Per-document styles
........................Quotes language
........................Base header level
........................Inserting JavaScript
................Using MathJax
........................Preview formulas with MathJax
................For Programmers
........................Syntax Highlighting
........................Github-style line breaks
........................Fenced code blocks
........Troubleshooting
................Preview Not Updating
........................Time Machine
................Overall Performance
................Additional Help
........About Markdown
................About MultiMarkdown
........................MultiMarkdown vs. Markdown
........................Syntax Guides
........................MultiMarkdown License
........Index


